
|
|
How to Add the Task Assignment Report
Prerequisite: Prior to proceeding with the instructions, convert the Task Assignment Report.sql file into a zip format.
Follow the steps below to add the Task Assignment Report in the Manage Standard Reports screen.
-
In PowerForm web, click the
 button, and select Manage Standard Reports from the menu list.
 -
Click the + Add Report button.

-
In the Add Report screen add the following information under the Details section.FIELD NAMEDESCRIPTIONSUGGESTED/REQUIRED VALUENameMandatory.A user friendly name of the standard report. This will be displayed when choosing a standard report to generate.This must be unique. If the value in the Report Name text box matches one that already exist in the database, the message “Report already exists" will be displayed during saving.Task Assignment ReportDescriptionOptional.Enter a short description of the report.Report TypeThe type of report that will be used. Available options:
-
.NET Assembly [.dll]
-
Crystal Reports [.rpt]
-
Jasper Reports (Internal) [.jrxml]
-
Jasper (External) [.jrxml]
-
Excel [.zip]
ExcelReport FileThe report file to be used. This is provided by CormantTaskAssignmentReport.sqlNote: Convert this file to a zip format.Class NameThe class name that implements the MPower.StandardReports.IStandardReportBuilder interface.MPower.StandardReports.TaskAgingReport.Assembly.TaskAgingReportBuilder -
-
Click the Upload a Report File (.zip) button.
-
Locate the TaskAssignmentReport.zip file and click the Open button. The application will validate if the uploaded file is valid. If valid, the file name of the report file will be displayed after the Upload a report file button.
-
Under Parameters sections, click the Add Parameter button and enter the following:PARAMETER NAMETYPELABELREQUIREDfromDateDateFrom DateYestoDateDateEnd DateYesagentIdAgentAgentNoservice_groupService GroupService GroupNoservice_typeService TypeService TypeNo
-
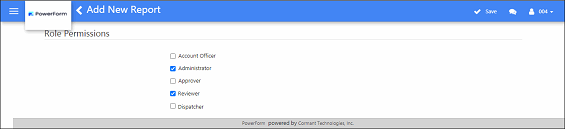
Under the Roles section, mark the checkbox of the roles that will have access to the report.
-
When done, click the Save button on the menu bar.
The roles marked under the Role Permission screen should have the permission to the Standard Reports feature to be able to display the Standard Reports screen. This feature is granted to a role during Roles creation. If this feature has not been granted to the role, see the topic ‘How to Give a Role Permission to Permission to Generate Standard Reports ’. Skip the section if configuration has already been made for the role to use Standard Reports.